Subscribe to the RSS Feed
FreeWordpressThemes.us
Free WordPress Tutorials and Themes.

16 Powerful WordPress SEO Tips (That Actually Work)

March 15th, 2017 by admin

Over the internet, you will find hundreds of discussions, debating whether the SEO is dead or not. As I understand most of the things, I think those who say, SEO is dead, never understood a bit of it!

SEO is a technical thing, and so does a Search Engine, say Google!

As long as Google is going to rely on codes to judge the ranking of a blog post, there will be bugs to manipulate those rankings.

Don’t take it on the negative side. There are both white and black (add ‘hat’) SEO techniques and today, we will be discussing them here.

In past five years, Google has done remarkable progress in machine learning and have implemented a lot of their findings into the search engine itself.

What it does mean is that the rankings are now calculated intelligently, rather than using just codes and scorecards.

For all SEO experts out there who were always on the White-Hat side, this has been a good thing. But, for the Black-Hat ones, it has been a hell of a journey.

People have their rankings and markets they earlier used to dominate. The third term, Grey-Hat still exists and works in some cases!

Do you want to discuss this term thoroughly? Let me know in the comment section, as we can have a detailed discussion which will clear a lot of things for both of us!

Powerful WordPress SEO Tips That Works!

Right now, let’s focus on the guide. Yes, the best WordPress SEO guide!

Exclusive Bonus: Download our Free WordPress Growth hacking eBook to get more tips and strategies I use to attract million of visitors to my blog every year.

The default WordPress installation is a powerful recipe, but it lacks almost, every important SEO tool or element. This is why we’ve to take care of the SEO part either manually or via third-party plugins.

Let me just break everything into small headings so that you can easily follow them.

Using an SEO Plugin

Earlier, the fight between All in One SEO and Yoast SEO plugin was stiff. But, the way Yoast SEO plugin has advanced in terms of everything related to SEO has helped them win the race.

Go ahead and ask in any community and most of the marketers are going to recommend you to go with Yoast SEO plugin. Of course, there are a few alternatives to it, but this one is free!

An SEO plugin adds the missing elements to the WordPress core, like handling the no-follow tags, archive, indexing of certain pages, manipulating the title, description, and keyword tags, etc.

So, this is the second thing you need to do. Install Yoast SEO plugin and set it up!

Get your Permalinks right 

Permalinks in WordPress is a tool where you control how the URLs are going to look at the website.

For a news website, you should add the title, year, month, and post ID to the permalink.

For a website sharing universal facts, which has nothing to do with the date, you should keep the title and post ID in the permalink.

Avoid using stop words. There is a setting in Yoast SEO plugin which can take care of it, but you should always cross-check a permalink before hitting the Publish button.

Google Webmaster Tool

It’s an official tool using which you can control certain factors related to SEO of your website.

Like, you can remove a particular page from Google’s index (the ones no longer live on the website).

You can even recommend the links that can be used for Sitelinks. You can see the number of external and internal links to a particular page or the homepage itself. And, so on!

It is imperative for a website to be listed inside Google Webmaster tool, as using the available tools, you can have a bit of control over the ranking, or at least, indexing!

Keyword Research

Keyword research is the difference between singing to a roomful of audience or crickets. According to search Engine Watch “ 91.5% other websites never venture past the first page results.”

Over the past 8 years, the clients/friends that I have worked with failed to grasp the concept of proper keyword research.

Which isn’t just finding a bunch of keywords people are searching for, it’s understanding also your website power to rank. Getting those high volumes but low-hanging keywords to build up your site’s authority to then target more competitive terms.

Check out my comparison of the top keyword research tools SEMrush v Ahrefs v Moz v Spytools tried and tested by me.

Focus Keyword

The number of times a primary keyword is part of the complete content is what Keyword Density is.

The debate over the exact percentage is never going to end, as it varies with the case.

As per my experience, 2% should be the maximum keyword density one should aim for. Usually, I try to keep it around 1% and use related long tail keywords.

Title and Sub-Headings

The title is the important part as it’s the first thing a user see in the search engine listing. If it’s not attractive, you can forget about getting clicks as expected.

It’s another area where the primary keyword or subject of the post should be fit in.

Earlier, we used to add two or even three keywords in the title, and it used to rank at better positions. These days, adding the primary keyword and then trying to make the title look unique, is the best practice.

Other than the title, sub-headings inside the content needs to be used. You can add the primary keyword in one of the sub-headings (H2, H3, H4), and related long tail keywords in other ones.

Never overdo the keyword stuffing as it will add negative marks to the overall scorecard.

Increase CTR with Meta Descriptions

A meta description is that little snippet of text that you see in the search engines below your site title. Crafting a compelling meta description can be the difference between getting 10 or 100 clicks-throughs.

To do this ensure that you’ve got an SEO plugin installed or your theme support the ability to enter meta title and meta description.

Pro tip: look at the ads above the organic search results to see what power words or phrases that include in their ad copy.

Image Alt Tags

Image ALT tags, in short, explained to the search engine and screen readers what the image is about and gives users a text alternative of the image. This is not just important from a search engine standpoint but also from an accessibility perspective.

We use SEO friendly images to display an alternative text for all our images automatically.

Optimizing the Images

Without pictures, a blog post looks boring!

But, adding heavy images can slow down a page which will again affect the overall ranking.

So, compress your picture before uploading it to the blog. You can use tools like ShrinkPictures or simply reduce its resolution using Paint or Image Viewer of Mac.

Before uploading a pic, make sure you rename it. Try and add a name which defines the image and this is another area where you can include the primary keyword.
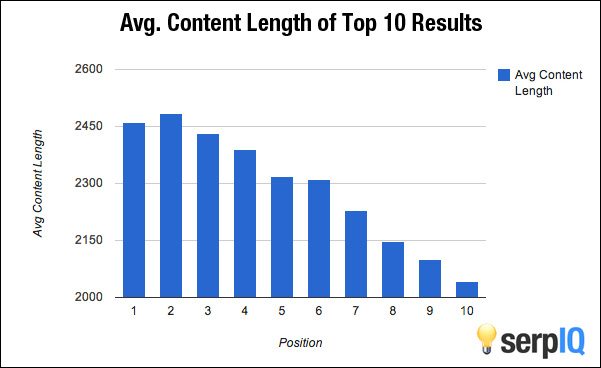
Content-Lenght

It’s a well-known fact that Google prefers Lengthier content than thin content and in some case penalized sites with lots of thin content. There have been numerous case studies around the web which supports this, and my personal experience holds it to be true.

serpIQ published an interesting statistics which underlines the importance of content-length.


You can do a quick test for yourself by checking out SEMrush > Projects > site audit.

To compare the Avg word count of the top 10 sites ranking for your targeted keywords.

Alternatively Google, your keyword, do a word count check to get your average.

Interlinking and Source Mentioning

If you’ve published a post which is related to this newer one, then go ahead and interlink it. Interlinking not only helps in bringing down the Bounce Rate, but it brings a lot of hidden fruits.

Google and other search engines, favors the interlinking when done with the right intention.

The same rule is applied to the source mentioning. If there is a related post published on another website with authority, then adding that as a source is a good practice.

If you’re not sure about the authority of the external site, then simply add a ‘nofollow’ tag and no harm will be done!

Link Building – Off Page SEO

For an authority blog, there is no need to make links manually. You need to focus on content quality, and other blogs will start linking automatically.

But, for short term blogs, you can experiment with different techniques of making links, manually or via software.

As per Google’s guidelines, making links manually is not a good practice, and algorithm updates like Penguin are specifically developed to target such blogs.

So, you need to understand pros and cons, properly before making a move!

Sitemap

Again, these are just examples of best practices followed by experts. You’ve rights to experiment!

Schema Markup

Schema markup is a piece of code that you implement on your website which helps in a search engine return more useful information to users. If you’ve ever seen a star review rating, movie showing time, the price or availability of a product, this is all examples of rich snippets.

Taking advantage of this will give your website more retail space in the search engines. Plus you will be providing a better user experience and get more qualified leads.

You can learn more about schema markups here and download one of my favorite WordPress plugins to implement this on your site.

Multi-language WordPress SEO

In my experience having a multi-language WordPress site can have a positive impact on your traffic. There as been numerous studies on the web to support this

I thought it would be a good experiment to translate NeilPatel.com into 82 different languages. Within three weeks of doing this, I saw a 47% increase in my search traffic.Neil Patel

All the sites I currently own gets visitors from all over the world consuming my content. And of course, it would make for a better user experience if I was able to translate that content into their local language.

To achieve this, check out: WordPress translation plugins.

To learn more about Google’s best practice watch this:


Fix Broken Links

To run a successful SEO campaign, it’s always important to keep the users at the forefront of your mind. This holds true when it comes to broken links, it not only provides a poor user experience but can also harm your search engine rankings.

That is why it’s vital to carry out a regular audit of your website to check for any issues or broken links.

You can use the WordPress plugins to check for broken links automatically but in my experience that usually slows down your website. And is banned by many hosting companies such as WP Engine due to the amount of resources they use.

An alternative would be to check your broken links of our online broken link checker tool and such as http://www.brokenlinkcheck.com/.

Mobile Usability

Mobile usability will play a major part in your overall SEO optimization strategy as we see more users browsing the web on mobile devices. In 2015 Google rolled out a mobile friendly algorithm which favors mobile friendly sites. Having a responsive website is a great start but in 2017 and beyond having a mobile-friendly site which supports Accelerated Mobile Pages (AMP) is a must. That’s if you want to rank above your competition and provide a better users experience.

By having accelerated mobile pages implemented, you also qualify for Facebook instant articles.

You can check to see if your website is mobile-friendly here: Mobile Friendly

To download and implement AMP on your site use this nifty plugin: AMP

Overall Page Speed or Performance

The time a webpage takes to load completely in a web browser is termed as its Performance, and for the best results, it should be as low as possible.

As per the standards set by Google, an average page speed of a webpage should be below 2 seconds. If it’s going beyond that, then you need to work on optimizing the webpage.

In most of the cases, the plugins and theme used with the WordPress installation are the culprits behind heavy load.

So, the first lesson to learn is to use premium or quality free theme, which is lightweight and keep the number of active plugins to a minimum.

Within the content, make sure you’re not adding a lot of videos or images from other servers as it will increase the number of HTTP requests, which will increase the page load speed.

In modern days, performance is a crucial ranking factor, and thus, part of the SEO checklist!

Over to You

Following these steps, one can rank a new blog post and even outrank the competitors. It all depends on the niche, competition for the keyword and how well you’ve optimized the blog post for these factors.

There is no sure-fire way by which you can achieve expected results. Internet Marketing, and particularly this SEO was always an experiment, and it will always remain one.

So, keep on trying different flavors of this same recipe and see which one works in your favor.

The post 16 Powerful WordPress SEO Tips (That Actually Work) appeared first on SoftwareFindr.

Written by - Visit Website

Posted in Stuff from wprocks.com | No Comments »

The Best WordPress Security Guide – Step by Step (2017)

February 23rd, 2017 by admin

Sucuri releases a hacked website report for each quarter. Their latest report says that, of all the websites that were hacked in the third quarter of 2016, every 3 out of the 4 websites were developed on WordPress.

If you are running a WordPress site and haven’t been hacked yet, you are a very lucky. But how long will luck favor you?

Is it better to take chances based on luck, or be proactive and take preventive measures to make sure that you aren’t getting hacked? I can tell you voted for the proactive measures. In that case, you have come to the right place.

Download our 28 steps checklist (9 extra bonus)

Secure your website with our ultimate 28-step security checklist for WordPress.

Click here to Download your Checklist

In this best and frequently updated WordPress security guide, I will share all the latest tips, trips, and techniques to enhance the security of your WordPress site. Follow these steps and will have strong reasons to believe that you will own that WordPress site which isn’t hacked or taken down.

Let’s get started with your personal security.

  1. Maintain Personal Security

You log in to your WordPress site from your computer. It is also likely that you have saved the login information for your primary email address, the website, and lots of other critical information on your computer. What happens if your PC gets compromised? In some cases, hackers can also put malware into your browser or router. If any of these happens, hackers might get instant access to your email accounts, website(s), and the social media profiles.

Therefore, the first step in ensuring the best security of your WordPress site is to safeguard your computer. You should use an anti-virus program and keep it updated on a regular basis. These days, there are lots of new threats like ransomware, adware, spyware, crapware, etc. You need to use the Malwarebytes Anti-malware tool to detect these.

Other common personal security tips include enabling the firewall, using the latest versions of various software, using only trusted software, avoiding cracked or pirated software, being alert about social engineering, scams, and other phishing attacks, etc.

  1. Keep WordPress Updated

WordPress is an open-source platform. That means hackers and evil people can inspect the code to find out bugs or weak points. These will help them gain unauthorized access to WordPress sites. But luckily, there are lots of security experts out there who are looking for these issues too. Once they report these issues, the WordPress team will release an update addressing those bugs and vulnerabilities.

For instance, WordPress 4.7.2 is the latest version at the time of writing this post. And this security update has taken care of a severe security vulnerability along with 3 other security issues.

As you can see, using outdated versions of WordPress puts you into serious security risks. Hackers can easily find out sites still using older versions of WordPress and try to exploit the vulnerabilities.

So, if you haven’t updated your WordPress site yet, open a new tab and do it now.

I also recommend enabling auto-update for your WordPress site. To do that, add the following line to your wp-config.php file –

define('WP_AUTO_UPDATE_CORE', true);
  1. Carry Out Regular Backup

Everybody knows the importance of keeping regular backups. But only a few follow through with the advice. The reason behind that is most people believe that they won’t get hacked, they won’t get locked out of their website due to incorrect security settings, or their server won’t crash.

But guess what? Smart Passive Income experienced a server issue, and big sites get regularly hacked (including Sony, the Home Depot, JPMorgan, Target, and TechCrunch).

Don’t risk losing your site only because setting up a backup schedule takes 30 minutes or so. Having the schedule in place will give an incredible peace of mind and save you in the case of any catastrophic events.

There are lots of excellent backup plugins for WordPress. First of all, there is VaultPress, a complete backup solution from the same company which created WordPress. It offers both daily and real-time backups along with simple restoration and site migration features.

If you are looking for free options, you can’t go wrong with UpdraftPlus, Duplicator, and BackWPup. Each of these plugins allows you to create regular backups and store the backup files on cloud storage services.

  1. Use a Stronger Password

Using a weak password is one of the most vulnerable parts of your WordPress site’s security. While most people are still using the same old passwords over and over, I believe the WordPress website owners are better than that. But at the same time, password-cracking techniques are getting very sophisticated too.

As Wordfence has shown in this post, it will take a moderately powerful computer about 18 minutes to break a 9-character password containing only lowercase letters and numbers. Which means you can’t rely on the old-school methods of combining numbers and letters and thinking you are secure.

So, what’s the best way to create a stronger password for your website? First of all, you should use a combination of upper and lowercase characters, special characters, and numbers. The password length should be at least 12 characters. And it is a good idea to change your password at least once every 4 months.

Generating and remembering difficult passwords is a boring and time-consuming process. This is why I suggest using a dedicated password management tool like LastPass to handle your passwords. This handy tool will help you create complex passwords and remember these passwords for you.

If you want to be absolutely sure about the login security, you should start using 2-factor authentication, which is our next step in this tutorial.

  1. Add 2-Factor Authentication

As you can guess from the name, 2-factor authentication uses two steps to authenticate your identity before allowing you to log in. While there are different types of 2-factor authentication methods available, the most popular method is to use your mobile or tablet to verify yourself.

In this method, the first step is to provide your username and password. Provided these are correct, you will be allowed to proceed to the second step. In this step, you will get a verification code on your cellphone or tablet device. You have to provide that code to make the final confirmation. You can log in to the site only after finishing both of these steps successfully.

Using 2-factor authentication adds an extra layer of security to your website. When using this system, your website will remain secure even if someone manages to get access to your username and password.

Clef Two-Factor Authentication and Google Authenticator are two of the most popular plugins to enable 2-Factor authentication on your WordPress site.

  1. Limit Login Attempts

The default setting of WordPress allows anyone to try unlimited passwords for logging in. Having open access like this, hackers use modern tools and scripts to try various combinations of usernames and passwords to gain access to the website. This is called brute force attack.

The best way to deal with this problem is to use a plugin which limits the maximum number of login attempts within a certain period of time. For instance, you can choose to temporarily block a visitor after 5 unsuccessful login attempts. It is also possible to select a custom lockout period for such attempts.

Login LockDown is the most popular plugin for limiting login attempts. By default, the plugin allows 3 login attempts in 5 minutes. Breaking this rule will block the IP address of that visitor for an hour. You can change these settings by going to Settings > Login LockDon from your website dashboard. The plugin also shows a history of the locked out IP addresses, which could be useful for some people.

  1. Rename the Login Pages

For the majority of WordPress sites, the login page URL would be this –

www.yoursite.com/wp-login.php

Replace the ‘wp-login.php’ part with ‘admin’ ‘wp-admin,’ and you will be redirected to the same login page. Since this is the default setting, it is true for all WordPress sites. And most website owners don’t consider these as any kind of security threat.

But the reality is they could be potentially vulnerable points for your WordPress site. First of all, they leak the information that your website is powered by WordPress. And since most WordPress sites have an account with the ‘admin’ username, all the hackers have to do is to try brute force attacks to get your password.

To save your WordPress site from these vulnerabilities, you need to change the default login URL’s. There are several WordPress plugins which allow you to do that. WPS Hide Login and WP Hide & Security Enhancer are two of the most popular choices among these. Both of these plugins allow you to replace the default login URL’s with your own choices.

  1. Change the ‘admin’ Username

As I have just discussed, most WordPress sites have an administrator account with the ‘admin’ username. This happens because WordPress used to choose this username on its earlier versions. While the newer versions allow the users to choose their own username, a lot of people still go for the ‘admin’ username. This makes the job half-easy for the hackers.

If you have any user on your WordPress site with ‘admin’ or other easily predictable names, you should change those usernames immediately. To do that, log into the PHPMyAdmin or any other database management tool your server is using. Run the following command in the database –

UPDATE wp_users SET user_login = 'newusername' WHERE user_login = 'admin';

Make sure that you have replaced ‘newusername’ with the username you want to use. And if you want to change the username for any other user, replace ‘admin’ with that username as well.

Alternatively, if you are not comfortable in dealing with the database, there is an easier option for you. Install the excellent WP-DBManager plugin on your website. This handy plugin allows you to run SQL commands right from your website.

  1. Ensure Strong Spam Protection

Along with hackers, spammers are also a major threat to WordPress sites. The primary target of spammers is to use your server for sending spam emails. This can lead to your server IP address being blacklisted on the leading ISP’s and email services. You can avoid the spamming attacks by following the security advice mentioned in this article.

Spam comments are another irritating thing for website owners. Having spam comments indicates that you don’t care about the website quality, which may lead your visitors to lose faith from your website. Since most of these spam comments also content backlinks to their websites, it might leave a bad impact on your website’s SEO too.

There are several dedicated WordPress plugins which help you to prevent spam comments. Among these, Akismet comes pre-installed with WordPress. Other popular choices include WP-SpamShield Anti-Spam, SI CAPTCHA Anti-Spam, and Anti-spam.

10. Scan Your Website

Contrary to popular knowledge, hackers aren’t always taking down all the sites they can get their hands on. Instead, they might get control of your website and use it to send spam emails, conduct DDoS attacks, use your personal information for identity theft, or for whatever purpose they want.

The worst part is all of these can continue without you noticing anything suspicious. You only take preventive measures when you find out that your website is down. But you never know if or when your website is used for any of those activities. The best way to deal with this is to scan your website on a regular basis.

Performing regular scans of your website will help you find suspicious, malicious codes on your website and track any unauthorized changes in your website’s files. Popular plugins to scan website code include Theme Authenticity Checker, Ultimate Security Checker, Theme Check, and AntiVirus. Yes, I know the first two plugins haven’t been updated within the last 2 years. But these plugins are widely used and there haven’t been any bad reports so far.

On the other hand, if you want to track file changes on your WordPress site, you can use WordFence or iThemes Security to do so.

11. Use WordPress Security Keys

WordPress security keys were introduced in version 2.6 of the platform. These keys will add random elements to your password, making it a lot harder to crack. The keys also ensure better encryption for the data stored in the visitor’s cookies.

In general, self-hosted WordPress sites don’t have the security keys readily defined. You have to do it yourself. Luckily, the process is very simple.

First of all, go to the official secret key generator page. Each time you reload the page, a new set of keys will be provided. Copy all the content of the page. You have to add this code to the wp-config.php file of your WordPress installation.

You can access the wp-config.php file by using FTP or the default file manager provided by your hosting. Find out the following section in the file –

Replace these codes with the copied code from the secret key generator page. Save the wp-config.php file, and that’s it, you have successfully added an extra layer of security to your WordPress site.

12. Be Careful about Themes and Plugins

Themes and plugins are accountable for 49% of security vulnerabilities in WordPress. Another report reveals that about 1 in every 10 plugins in the official repository contains at least one medium-level security issue.

From all these statistics, it is absolutely clear that we need to be a lot more careful in choosing and using the themes and plugins on our WordPress sites. Yes, there is a review process before a theme or plugin gets accepted. But the process is run by volunteers, which means it is not full-proof.

So, how can you be careful about the themes and plugins used on your WordPress site? First of all, you need to make sure that you are using only the plugins you need. If you find a plugin which you aren’t using anymore, delete it immediately. The same advice applies to the inactive themes too.

When installing new plugins, make sure that you are choosing ones which are actively maintained. For instance, you might find some plugin which hasn’t been updated within the last 2 years. You should be very careful in using such outdated plugins as they might contain security loopholes.

The best practice is to use themes and plugins from reliable sources only. Some common sources include the WordPress repositories, ThemeForest, CodeCanyon, Elegant Themes, MyThemeShop, StudioPress, WPMU Dev, Thrive Themes, etc.

Another important thing is to keep away from the cracked or nulled themes or plugins. A quick search on the internet will provide you with free copies of most of the premium themes and plugins. But the majority of these are injected with malicious codes, backdoors, or other kinds of security loopholes. Using these puts your site on serious risks of being hacked, abused, or taken down.

13. Disable File Editing

WordPress comes with simple solutions for editing the theme and plugin files right from the dashboard. You don’t even have to use FTP or the file manager to access these files. You can perform the changes as long as you can access the dashboard. This makes it very easy for the developers and admin(s) of your site to apply customizations or perform little tweaks quickly.

But what if a hacker gets access to the dashboard? He will have all the access as you do. Most importantly, he will be able to edit the theme and plugin files. This allows the hacker to inject and execute any malicious code on your website without requiring direct access to the server. This puts your website into serious security threats.

The best way to deal with this problem is to disable the theme and plugin editors. You can do that by adding the following code to your wp-config.php file –

define( 'DISALLOW_FILE_EDIT', true );

14. Disable XML-RPC

XML-RPC is the short form of XML Remote Procedure Call. This is required for using some Jetpack features, logging into your website’s admin section from smartphones, and for the pingbacks and trackbacks from other websites. XML-RPC has been with WordPress since the beginning.

There are two main vulnerabilities associated with XML-RPC –

  • The xmlrpc.php file allows the attackers to test thousands of password without raising any issues for the standard security tools. This is confirmed by Sucuri.
  • Incapsula has shown that the xmlrpc.php file offers an easy way to perform DDoS attacks on WordPress sites.

For both of these reasons, it is highly recommended that you disable XML-RPC on your WordPress site. There are two ways to do that –

  • Rename the xmlrpc.php file to something else. You will find the file in the root folder of your WordPress installation.
  • Add the following code at the top of your .htaccess file –
# START XML RPC BLOCKING
<Files xmlrpc.php>
Order Deny,Allow
Deny from all
</Files>
# FINISH XML RPC BLOCKING

15. Review the File Permissions

File permissions of your website define which type of user will have access to which function. The available functions include read, write, modify, delete, etc.

According to the official file permission article, there are three types of users –

  • User: This is the owner of the website.
  • Group: Other people who can log into your website, like the registered members.
  • World: This is any visitor who tries to access the files.

File permissions are 3-digit numbers. The first digit is for the user, the second one is for the group, and the third digit is for the world. The highest file permission is 777, where all three types of users are provided with all the functions. And the least possible permission is 444, where everyone can read the file only.

You should check out the official doc to have a better understanding of the various file permissions. In short, the doc recommends the following file permissions –

  • Directories should have 750 or 755.
  • Files should have 640 or 644.
  • The wp-config.php file should have 400 or 440.

You can change the file permission by going to the file manager. Most file managers will show the permission status in a separate row. You can change the file permission of any file or directory by right-clicking on the item and choosing ‘Change Permission.’

Alternatively, you can change the directory and file permissions by using FTP or All In One WP Security & Firewall. Check out this detailed tutorial to know how to do that.

16. Change Database Prefix

This is another default setting of WordPress which can be potentially dangerous for your website, by default, all the tables of the database begin with ‘wp_’. What’s more, the database tables names are exactly the same for all WordPress installations.

This makes it a bit easier for the hackers to infiltrate your website. Luckily, it is not that hard to change the default table names. If you are already using a dedicated security plugin like iThemes Security, All in One WP Security & Firewall, or BulletProof Security, you will find dedicated options to do that.

Before you change the database table names, make sure that you are creating a complete backup of your website. This makes sure that you can get back to the previous condition in case something goes wrong during the process.

17. Use an SSL Certificate

SSL is the shortened form of Secure Sockets Layer. This is an encryption technology to ensure better security for the information exchanged between the website and the visitor. Having SSL implies an authentic, professional attitude, which is crucial for establishing your brand. And if your website involves any kind of monetary transactions, SSL is a must-have feature for you.

Still looking for more reasons? How about something from Google? Yes, the search engine giant has publicly stated that sites with SSL will get preference on its search result pages.

Now that you know why SSL is important for your site, check out this detailed post to know how you can get SSL for free.

18. Hosting Matters

When you want to ensure the best security for your WordPress website, you can’t ignore the importance of choosing a reliable host. A good web hosting service will perform regular maintenance to ensure the best performance out of the servers.

For instance, A2Hosting provides detailed information about their regular maintenance schedule. Before choosing a web host, you should find out what their maintenance policy is.

The main purpose of a hosting service is to make sure that their clients’ websites are available to the visitors 24/7. You need to choose a hosting which has long track records of offering excellent uptimes.

It is also important to make sure that your web host keeps regular backups of your website. That will keep you reassured that there’s an additional backup available even if your own backup fails for any reason. Other important features include support for the latest PHP and MySQL versions, WordPress-optimized firewall, and automatic malware scanning.

Among the different types of hosting packages, shared hosting is the most vulnerable one. Once hackers get access to a single website of the server, they might get unlimited access to all the other websites hosted on the same server. This is why VPS or dedicated servers are highly recommended to ensure the best security for your website.

19. Few More Important Tips

Along with the steps mentioned above, here are some other tips you can use to further strengthen the security of your WordPress site –

  • Add a captcha or security question to the login page. This will be a useful step to prevent the brute force attacks. Better WordPress reCAPTCHA could be an excellent choice in this case.
  • Use the .htaccess file to strengthen security. Follow this in-depth tutorial to know more about the process.
  • Remove the WordPress version if you are not using the latest version of the platform. This post at WP Beginner shows you how to do that.
  • Tracking the dashboard activity of the users could be an excellent way to find out potential security loopholes. Here’s a detailed guideline about how to do that.
  • Disable PHP file execution to prevent unexpected events from taking place on your website. Here’s how to do it within a few minutes.
  • Set up a system to log out idle users and to save your WordPress site from session hijacking attempts. Check out this tutorial to find out how to do that.

Over to You

Ensuring the best security for your WordPress site is an ongoing process. Nobody can ever claim to have the complete list of actions to secure your WordPress website. Having said that, you can rest assured that this is one of the most up-to-date WordPress security guides you will find right now.

Following the tips mentioned above will definitely make your website a lot more secure. And the regular backup will make sure that you can get back your site even if you get hacked or lose your data.

So, which of these measures are you applying right now? Did I miss any of your favorite WordPress security step in this tutorial? Let me know in the comments.

The post The Best WordPress Security Guide – Step by Step (2017) appeared first on SoftwareFindr.

Written by - Visit Website

Posted in Stuff from wprocks.com | No Comments »

Migrating Joomla to WordPress: A Step-by-Step Guide

February 12th, 2017 by admin

Joomla is a powerful content management system, but it still lacks behind when we compare it with the WordPress. This comparison doesn’t make Joomla any less powerful, but considering the fact that WordPress powers more number of websites, has a better number of plugins and themes in the catalogue.

This offers tonnes of extension options, thus, making it a better contender. So far, your website has done well with Joomla, but now you’re planning to make it even better.

Moving to the WordPress is definitely a better plan. However, the process requires you to learn a couple of new things. In this detailed guide, I’ll be covering everything that will help you migrate a website from Joomla to WordPress.

Prerequisite

Before you move ahead with the actual procedure, there are a few things need attention.

Before making any changes, it is important to take a full backup of everything which is part of Joomla website. Once the backup is ready, keep this file on the local system.

WordPress is simple, but it features tonnes of elements inside. Also, the way tools work in WordPress is different in Joomla. So, it will be a wise decision to get familiar with how WordPress works and what all it features inside.

It if feels too much of work, then staying with Joomla is the safer option. Or, you can join a course and learn new things about WordPress. The main point here is to get familiar with the new ground.

There is a Joomla website in the scene, but there is no WordPress website at this time. So, the first thing is to get a new domain, a new web host, and install the WordPress script in this new configuration.

Once the host is bought and the domain is configured, you need to login into the cPanel and hit the SimpleScripts or the WordPress icon available inside.

It will take you to the WordPress installation procedure which is very simple. You just need to select the domain, enter login details and hit the button which takes care of rest of the things.

The procedure will be over within 1-2 minutes, depending on the speed of the server and you’ll be greeted with login details and access to the Dashboard area of the newly installed WordPress site.

This was the prerequisite section of this guide on how to migrate Joomla site to WordPress. Considering the Joomla website is already ready, you are ready to proceed.

How to Migrate Joomla to WordPress?

The procedure is simple, but you need to have proper attention at every step. Make sure you follow each and every step, as mentioned below.

Step 1 – As I mentioned about the number of plugins available for WordPress, there is also a plugin to handle this migration. FG Joomla to WordPress is the one you need to look for. So, login to the Dashboard area and click on Add New button under Plugins heading.

Step 2 – Now, enter the name of the plugin and hit the Install Now button once found. As the installation procedure is over, hit the Activate Plugin button.

Step 3 – Login to the Joomla site and under the System heading, click on the Global Configuration option. Yes, it’s available on the drop-down menu.

Step 4 – Inside this, click on the Server option which holds the information related to the database. Take a screenshot or note down these details or keep the tab opened.

Step 5 – Get back to the WordPress Dashboard, and click on the Import button available under the Tools heading. At this page, the plugin you installed earlier will be mentioned and you need to click on the same.

Step 6 – Hit the Empty WordPress content button which dumps everything which is available on this website right now.

Step 7 – Moving next, you need to enter the URL of the Joomla website and then the Database details which are opened in the other tab.

Step 8 – There are a bunch of options which can be selected as per the configuration you wish to set. Like the new posts can be imported in Draft or can be directly Published, as it is.

Step 9 – If the media files on the Joomla site are not that heavy, then go ahead with the same set of configuration for the Media files. If they are heavy, you can either skip it (later upload them manually) or use the Force media import option to set a timed out limit.

Step 10 – Select the last option which imports meta keywords as tags in the new WordPress site. And, hit the Start/Resume the Import button available at the bottom.

Step 11 – At last, once the import part is over, head over to the same plugin page again, and inside, click on an option which is labelled as, Modify Internal Links.

Conclusion

Now that everything seems to be over, only the migration part is finished. WordPress has more options than Joomla, depending on the theme and plugins installed.

So, you need to invest more time configuring everything before making the website public again. In case you don’t want the users to see the configuration details, you can take help of a maintenance mode available inside the WordPress.

There are also a few free plugins and themes available which can set a maintenance page for a short while.

How was the procedure of migrating Joomla to WordPress at your end?

The post Migrating Joomla to WordPress: A Step-by-Step Guide appeared first on SoftwareFindr.

Written by - Visit Website

Posted in Stuff from wprocks.com | No Comments »

Wix vs Squarespace vs Virb vs Weebly vs Jimdo vs WordPress Theme Builders

January 29th, 2017 by admin

Gone are the days when you used to create websites from scratch. These days, it is all about choosing a website builder platform and get started with a stylish template. These platforms prepare the groundwork and handle all the basics of creating a website. Thanks to these platforms, creating a website has become a lot simpler now.

While that is a good news, it also brings the question of which website builder platform should you use? There are lots of platforms with various types of features, options, and capabilities. How do you know which one would be the best choice for you?

That was the question which led to this mega comparison post of Wix Vs Squarespace Vs Virb Vs Weebly Vs Jimdo Vs WordPress Theme Builders. In today’s post, I am going to take an in-depth look into each of these platforms and find out which one is best for you.

Are you ready? Let’s get started.

Wix

With an active user base of more than 90 million, Wix is one of the most popular website builder platforms available right now. It offers everything you need to create and manage your personal or business websites.

Ease of Use

Wix makes it very easy to get started with your website quickly. There are lots of attractive templates to create various types of websites including business, corporate, blog, personal, community, creative, events, design, music, photography, e-commerce, etc. It is also possible to choose a blank template and create your own design.

The built-in drag and drop feature will help you to make sure that everything is in place. Wix uses a unique technology called Artificial Design Intelligence to help you create beautiful layouts. The handy support center provides all the help you need to create and manage your website on Wix.

Performance

Wix puts a lot of effort to ensure the best performance of the websites. It offers both the domain and hosting for the premium users. Thanks to the mobile-first approach, your website will look great on any screen resolution.

The integrated site analytics will be very useful to check out detailed statistics about your website. With a few mouse clicks, you can find out which pages are getting the most visits, where the visitors are coming from, how well your website performs against the competitors, etc.

Wix comes with complete support for Eventbrite and ShoutOut email marketing service. That means you can manage your events and perform complete email marketing campaigns right from your website. There is a dedicated app market to get various third-party apps and services. These will help you improve the overall performance of your website.

Following the SEO best practices is a must for any modern website. Wix helps you to do that by offering a full suite of SEO options. You can define the meta tags, assign custom URL, use the necessary heading tags, add the target keywords, and control the anchor links for your posts and pages. Various Wix apps like Site Booster, SEO Wizard, SEO Coach Analytics will help you get better search engine ranking for your content.

Features

Wix comes with lots of professional, high quality stock images which you can use on your website. The built-in editor allows you to edit and enhance the images on the fly. There are more than 40 gallery styles to show off some of your most attractive images.

Features like strips, video backgrounds, and eye-catching parallax effects will make your website look very attractive. You can embed raw HTML code on the text editor and add any custom element you want. The platform also allows you to create one-page websites. You just need to choose the appropriate template and provide the content.

Full e-commerce support is another notable feature of Wix. The platform allows you to create a fully functional online store and sell digital or physical products right from your store. You can accept payments by using popular payment methods like credit cards, PayPal, and cash on delivery. Whenever applicable, you can set up the shipping and tax options for specific countries.

Wix forum allows you to create a thriving community around your website. Visitors can register themselves, join the conversation, follow others, and leave comments on other people’s posts.

The built-in social bar will be useful to promote your social media accounts. Wix also offers several Facebook tools for additional engagement with your visitors.

Who Is It For?

Wix could be a great choice for anyone who is looking for a readymade solution. If you want to create the website on your own, you have all the options here. On the other hand, it could be useful for the expert web designers as well. You can personalize the design and get started with the website in a matter of minutes.

Pricing

Wix offers a number of plans with different pricing points. While the free plan includes free hosting, it doesn’t allow your own domain, shows ads, and offers limited storage and bandwidth. The premium plans are priced at $4.5, $8.5, $12.5, $16.5, and $24.5 per month. Depending on which plan you choose, you can get a free domain, use your own favicon, get rid of the ads, get more storage and bandwidth, etc.

Pros

  • Includes a free plan so you can test out the platform.
  • Mobile apps so you can edit your site on the go.
  • Includes a newsletter creator.
  • Free SSL certificate.
  • Able to create a membership site.

Cons

  • Unable to export your site in the case you want to move to a different platform.

Squarespace

Starting as early as 2004, Squarespace is one of the oldest website builder platforms out there. Despite being in operation for so many years, it is still working great and providing lots of exciting, new features for the users.

Ease of Use

The Squarespace user interface is custom-tailored to make the whole process easier for everyone. As you can expect, there are lots of beautiful templates created by professional designers. The templates are divided into appropriate categories like online stores, creative services, community, food, health, fashion, media, professional, travel, home & living, etc. The platform also allows you to test multiple templates on your website and choose the best-looking one.

The custom WYSIWYG editor allows you to create unique layouts by using the various content types and multi-column structures. The proprietary LayoutEngine allows you to use various types of content blocks to create exactly the look you want for your website. You can use different types of blocks like audio, video, gallery, map, archive, product, menu, social, code, quote, button, form, newsletter, RSS, etc.

Squarespace also supports multiple contributors, which makes the whole website maintenance process a lot easier. You can set up different access levels according to the user type like administrator, content editor, moderator, store manager, billing staff, reporting staff, etc. The unified site login feature makes it super-simple to manage multiple Squarespace websites with a single login.

Performance

A large part of your website’s performance depends on the hosting provider. When using Squarespace, you won’t have to worry about this because the platform offers unlimited hosting and bandwidth for all plans. What’s more, there is a built-in CDN to increase the page loading speed. When you combine these with the free SSL feature, you have got the recipe to ensure a superior performance and excellent uptime for your website.

Being in the industry for more than a decade, Squarespace clearly knows the importance of tracking analytics to improve performance. Therefore, they offer the full range of options for website analytics. You will find real-time information about the page view, total number of visits and views, etc. The superior visitor insights features will help you find the keywords and sources of your visitors. There is a dedicated feature to find out the most popular contents and traffic sources for your website. What’s more, it is possible to filter all this information by the device type.

Progressive image loading is another Squarespace feature which can be a huge step in improving your website’s performance. This feature will load the visible images first, providing a faster browsing experience for the visitors. The platform will also deliver the correct sized images according to the device resolution.

Ensuring proper security is a key factor in improving website performance. When using Squarespace, you won’t have to worry about using third-party plugins, tools, or security patches. The expert professionals of the platform will make sure that your website is protected from the common security threats, including DDoS and Layer 7 threats.

Features

Your website needs professional design. Squarespace helps you achieve that by offering lots of attractive layouts created by top designers. The all-in-one templates cover all the details to make the website work out for you. You can get started with any of these templates and make the necessary customizations to get the exact look you want.

Squarespace supports all the TypeKit and Google Fonts. It is also possible to provide custom CSS and use video backgrounds. The mobile-optimized designs are guaranteed to look and work great on all screen resolutions, including mobile and tablet devices.

There are various customer engagement options to help you build an email list. You can use the signup forms, surveys, or applications and run full-fledged email campaigns. The platform offers built-in social sharing options, which allows the visitors to share the content on their preferred social media networks.

When using Squarespace, you will have total control over the comments by your visitors. Comments are displayed in beautiful threads with like counter for each comment. Commenters can use avatars and/or social media networks to verify their identity. If necessary, you can allow anonymous comments as well. It is also possible to enable comment moderation, sort comments, and block abusive filters.

You can use Squarespace to create an online store. The platform allows an unlimited number of products with several variations. Each product can have detailed information including text, image, audio, video, map, etc. Features like quick view and product zoom will help the customers to choose products quickly. Other notable features include mobile-optimized checkout process, speedy sign-up, multiple payment methods, discount codes, abandoned cart recovery, detailed order and inventory management, etc.

Who Is It For?

If you are concerned about the design and want to have total control about how your website looks, Squarespace could be a great choice for you. The large number of advanced management options also make it a top choice for tech-savvy people and website owners.

Pricing

There are two types of plans – websites and online stores. For websites, the personal plan is priced at $16 per month and allows 20 pages, unlimited storage and bandwidth, SSL, full e-commerce support. Priced at $26 per month, the business plan offers all features of personal along with unlimited pages, professional Google email, and $100 AdWords credit.

For online stores, the basic plan allows unlimited products, mobile-optimized checkout, accounting integration, unlimited storage and bandwidth. It is priced at $30 per month. On the other hand, the advanced plan is priced at $46 per month and offers all features of the basic plan along with abandoned cart recovery and real-time carrier shipping.

You can get a discount for all these plans by paying annually.

Pros

  • Free SSL certificate.
  • Mobile apps so you can edit your site on the go.
  • Allows you to export your site into WordPress.
  • Newsletter creator.

Cons

  • No Free plan(14 days trial).
  • Unable to create a membership site.

Weebly

Weebly comes with the whole suite of options for creating fully functional websites. The simple user interface is very straightforward and allows you to get started within a few minutes. The platform’s unique balance of power and usability have made it a popular choice among the users.

Ease of Use

Weebly is popular for its seamless user experience. In line with that, they make it very easy to create new websites. The website setup process starts by choosing the type. Next, you have to choose the theme, color, and provide the URL of your domain. Then, there is the powerful drag and drop page builder tool. The intuitive builder tool takes no time to familiarize. What’s more, there are handy tooltips to explain the purpose of various features.

In total, the whole process of creating and publishing a new website on Weebly shouldn’t take more than a few minutes. You can always change the style or apply other customizations from the admin panel.

Performance

Loading speed, uptime, availability etc. plays a significant role in the overall performance of any website. Weebly takes care of all these issues by offering a managed hosting platform for its customers. The cloud-based hosting is professionally optimized to ensure the optimal performance of your website and the best online experience for your visitors.

Weebly comes with powerful SEO tools to help you optimize your website for the popular search engines. All the template coding follows the SEO best practices. Features like built-in sitemap, simple HTML formatting, custom meta descriptions, alt tags for images, etc. will be very useful to help you achieve better ranking in the search engines. There is also a step-by-step guide to help you utilize all these features.

You can’t optimize your website unless you know the current status of your website. Weebly helps you do that by providing detailed website statistics. Along with regular information like the number of visitors, most visited pages, you will also find out which search terms they used and which are the top referring websites. Featuring complete integration with Google Analytics, you can enjoy real-time syncing of your data.

Dedicated solution for creating mobile websites is another notable feature of Weebly. For starters, all the available templates are optimized to look great on various screen resolutions. The drag and drop editor allows you to rearrange the website layout for mobile devices. It is also possible to check out real-life previews of your website on virtual mobile devices. That means you can rest assured that your Weebly site will look great on all mobile, tablet, and desktop devices.

Features

Weebly features one of the simplest but very powerful drag and drop page editors available right now. You can use this editor to set up and display attractive page layouts without requiring any advanced technical skills. The builder supports all the common elements like text, images, videos, maps, etc. You can add these elements and drag them to the desired position.

There are lots of professional themes and templates to help you get started as quickly as possible. The customization options allow you to choose the font, color, header style, backgrounds, custom slideshows, etc. If you have the skills, you can add custom HTML and CSS codes as well.

There is a fully featured solution for creating online forms. You can use the drag and drop interface for creating contact form, survey, poll, RSVP lists, etc. It is also possible to rearrange the form field positioning and review the submitted data.

Weebly is fully equipped with the necessary options for creating popular ecommerce websites. The fully functional shopping cart and checkout features are automatically added to your ecommerce store. You can add and manage hundreds of digital or physical products. The powerful search option includes several filters to help the customers find out their desired products.

The flexible shipping options allow you to offer different shipping types like free shipping, price-based rate, weight-based rate, location-based rate, etc. Other notable options include store management from mobile devices, dedicated ecommerce templates, specialized ecommerce hosting, several display options, coupons, advanced tax options, bulk import and export, cart abandonment emails, and transaction emails.

Who Is It For?

Weebly could be the choice when you are looking for a fast website creation solution, by which I mean really fast. Some quick examples I can think of are creating your portfolio site, an event site, a blog, or even sharing your resume. The flexible templates, intuitive page builder, and the overall structure make it an excellent platform for non-savvy people.

Pricing

Weebly offers a free plan along with 4 premium plans. The free plan doesn’t allow your own domain, shows ads, and is limited to 500MB of storage. The premium plans – Starter, Pro, Business, and Performance are priced at $8, $12, $25, and $49 per month respectively. All premium plans come with a free domain, Google ad credits, unlimited storage, detailed stats, no ads, ecommerce support, and lots of other benefits.

Pros

  • Allows you to export your site into WordPress.
  • Mobile apps so you can edit your site on the go.
  • Free SSL certificate.
  • Newsletter creator.

Cons

  • If you’ve accidentally deleted your website or pages, you’ll need to email Weebly & wait for them to restore the deletions.

WordPress

Unless you are a complete beginner to the website development world, you probably heard about WordPress already. While it is possible to install WordPress on your server, we will discuss about creating website by using WordPress.com, which is a unique combination of a website builder and a Content Management System.

Ease of Use

There are two parts of using WordPress.com – My Site and the Admin panel. My Site offers simple options to publish news posts, create new pages, create menus, choose a theme, install plugins, check out the stats, etc. The WYSIWYG editor in this part is simple and easy to use.

The Admin panel is where all the advanced options are located. And if you don’t have any experience of using WordPress before, getting around the admin panel and being familiar with the available options will take quite some time. That time is not wasted though, because it makes you familiar with the WordPress admin options, which will come in handy for creating virtually any type of website.

Performance

WordPress.com offers the largest range of themes among all the website builder platforms. There are 350+ free and premium themes available for you to choose from. You can find lots of attractive themes for creating different types of website including business, personal, minimal, travel, food, music, wedding, etc. If these types don’t satisfy you, you can use the advanced search filters like the available features, layout, responsiveness, color, price, etc.

The integrated statistics section will provide you with detailed information about the number of views and visitors for the day, week, month, or the year. It is also possible to integrate Google Analytics with your website to get even more data.

When it comes to SEO, WordPress is almost unbeatable. The superior coding structure of the platform follows all the SEO best practices. The sitemap of your website will be automatically created and sent to the major search engines. It will also help you to get your website verified with various search engines.

The platform also comes with full support for Google’s Accelerated Mobile Pages (AMP). That means your blog posts and pages will enjoy a significantly faster loading speed on various handheld devices.

WordPress.com allows you to import existing content from different sources like Blogger, Blogroll, Blogcast, TypePad, Posterous, Tumblr, Xanga, etc. Similarly, you can export your website data too.

Features

Being a Content Management System itself, WordPress is the best platform for creating blog, portfolio or any other content-rich website. The integrated post editor is intuitive and very powerful. You can add different categories, tags and define the slug, featured image, and excerpt for your posts. It is also possible to schedule the posts to be published on a future date and time. Along with the regular posts, you can publish other content types including quote, audio, video, image, gallery, link, etc.

WordPress comes with a very powerful form editor. You can use different form fields like text, textarea, radio, checkbox, number, email, etc. for your form. The submitted form data will be sent to the admin email address.

There are separate options to change the title, tagline, favicon, default language, and timezone of your website. There is another option to keep your site hidden or private, which can be useful when you are still developing the website.

The theme customizer is the home to all styling options. These options allow you to choose your own font, color, size, background, header, menu, etc. You can use the widgets to display various types of content on the sidebar, footer or other suitable places.

Strong comment management is a notable feature of WordPress. You can require the commenter to provide a name, an email address, or get registered. It is also possible to automatically close comments for older posts, enable threaded comments, receive email notifications for new comments, enable comment moderation, and blacklist any name, URL, email address, or IP address from commenting.

There are dedicated Android and iOS apps for managing your website from mobile devices. These apps allow you to check out the stats, manage comments, and publish new post or page while you are on the go.

Who Is It For?

WordPress.com is a great choice for creating any type of websites, except online stores. There is no fully integrated solution for creating ecommerce sites on WordPress.com. Otherwise, the large number of themes, unlimited customization options, superior support, and the powerful dashboard make WordPress.com a highly recommended website builder platform.

Pricing

As the other website builder platforms, WordPress also offers a free plan. This plan doesn’t allow your own domain and is limited to 3GB of storage and basic customization options only. On the other hand, there are 3 premium plans – Personal, Premium, and Business, priced at $2.99, $8.25, and $24.92 per month respectively. All paid plans allow your own domain, provides more storage space, more customization options, remove ads, etc.

Pros

  • Free SSL certificate.
  • Choose from WordPress.com or .blog domain on free plans.

Cons

  • Very limited when compared to the self-hosted WordPress.org version. Which we recommend going with.

Virb

Virb used to be a great platform for creating new websites. However, since GoDaddy acquired the platform in 2014, it hardly received any exciting new feature at all. But there are some people who still use Virb and somewhat satisfied by the service.

Ease of Use

Getting started with Virb is very easy. You need to provide all the information about your website while signing up for an account. Compared to the other platforms, this is rather unique. The next step is to choose the theme. There are several great-looking themes available. You can filter the themes by using various types like personal, portfolio, business, organization, restaurant, music, etc.

Virb has made it a lot easier to create specialized websites like photography, music, restaurant, designer, or general websites. For each of these types, there are some recommended themes and features which will help you get started quickly.

There are lots of customization options to help you choose your own color, font, and other styling features. It is also possible to add custom CSS and HTML to apply your own styling and to add custom elements.

Performance

Hosting plays a very important role in the overall performance of a website. Virb acknowledges this by offering cloud hosting for the users. Your website files will be hosted on secure cloud servers which are also capable of ensuring a fast delivery speed for the files. As the platform offers unlimited storage, you are free to store all the necessary website data on the server.

If you are creating a blog, list site, or other frequently updated website, you are going to have a large number of pages. Virb allows unlimited pages, which takes care of this issue. The built-in content delivery network will make sure that your pages are served from the nearest location of the visitor.

Virb works correctly with Google tools. That means you will have easy access to useful tools like Google Analytics and other tools right from your website. The platform also follows the SEO best practices to help you get better search engine ranking for your content.

Features

As I mentioned earlier, there are lots of readymade themes available for you. All these themes are provided with mobile styling. That means your website will look great on mobile, tablet, and other devices.

Virb allows a large number of page types including common names like about, contact, gallery, blog, etc. The store page will be useful for connecting your existing shopping carts. You can show the list of available products or other items by using the listing page type. And in case you want a blank layout, the custom page type is there for you.

Virb also comes with close integration with several third-party services. For instance, you can use Facebook, Twitter, Instagram, Google, SoundCloud, LastFM, Etsy, Instagram, Dribble, Tumblr, etc. with your website.

If you are creating a private website, there is a handy feature to protect your website by using a password. It is also possible to restrict specific pages with the password.

There are several ways to get help and support about using Virb. First of all, you can check out the video tutorials to find out the solution. Additionally, you can seek help from the Virb user community.

Who Is It For?

As you can already guess, I do not recommend Virb anymore. It has been a while since they updated their themes and they don’t offer any drag and drop feature. However, if you are looking for an alternative website development platform with a clean, simple layout, you can give it a try.

Pricing

Virb follows a simple pricing policy with a single plan for everyone. For $10 per month, you will get unlimited pages, cloud hosting, dedicated support, SEO tools, analytics, store integration, custom domain support, etc.

If you are a student, you can get your first year for free by using the special Virb student program.

Pros

  • Has all the features to run a basic website.

Cons

  • Hasn’t been updated in while(slowly declining)

Jimdo

Jimdo is a dedicated website building platform which aims to make the whole process easier for everyone. The Jimdo builder is powered by lots of templates and several customization options.

Ease of Use

When using Jimdo, you will find it a lot easier to create your website and get started within minutes. You just need to create an account, set up the basic configuration options and voila, your site is live on the internet.

The fully functional drag and drop editor allows you to create the exact layout you want. The platform also supports real-time implementation of your styling. That means your styling changes will be applied to the live site as you are making the customizations.

Jimdo supports widgets which allow you to embed content and information from other websites. For instance, you can show YouTube, Vimeo videos, embed SoundCloud audio tracks, show charts and infographics from info.gram, use Eventbrite and Google Calendar to create and manage events, collect email address with MailChimp, and use other popular services like Disqus, AddThis, Muut, PollDaddy, Gumroad, Munch, Wufoo, 99designs, etc.

It is also possible to create multi-language websites with Jimdo. The main interface supports 8 languages and the editor allows you to publish contents in any languages and display these on the same website.

Performance

At its core, Jimdo is specialized for speedy website creation and simple maintenance. That means you shouldn’t expect breathtaking performance from these websites. You will get an average performance with small-scale websites types like portfolio, small business, non-profit, wedding, restaurant, etc.

A plus point for Jimdo is all of its templates are totally redesigned and fully responsive. That means you will have a good-looking website which works perfectly on all devices and screen resolutions.

Jimdo also comes with a bunch of SEO options to help you get better search engine ranking for your content. The free plan focuses more on making the home page discoverable on the search engines. More powerful options like custom URL, XML sitemap, custom metadata, and the rankingCoach add-on are reserved for the pro and business plans. The business plan enjoys some additional features like URL redirection and meta tag automation.

The premium plans also allow you to use branded email addresses with your domain name. This is a definite plus for your branding. As an additional bonus, the business plan allows unlimited forwarding aliases. This will be useful to make sure that the emails are delivered to the right person or department.

Features

Like all other website builder platforms, Jimdo also comes with lots of attractive templates for various types of websites. As the templates are divided into categories like business, store, personal, portfolio, etc., you can easily find a suitable one for your website.

Full support for online stores is a notable feature of the platform. While all pricing plans support the store, they offer different types of options and capabilities based on your chosen plan. For instance, the free plan allows only 5 store items, while the pro and business plan allows 15 and an unlimited number of products respectively.

All the plans support PayPal as the primary payment method. You have to go for the premium plans to get access to other payment methods. It is also possible to make test payments before you actually open the store.

Jimdo also comes with a strong support for managing your website from mobile devices. There are both Android and iOS apps to create, edit, and manage websites from anywhere in the world. You can use the mobile devices to perform various tasks like publishing a new post, upload new photos, check out the statistics, etc.

Who Is It For?

Jimdo could be a great choice for people who want to launch their website as quickly as possible. As the platform will suggest the best features and settings options according to your website type, you won’t have to spend hours configuring your website for the best results.

Pricing

There are three pricing plans. The free plan is limited to 500MB storage, 2GB bandwidth, and doesn’t allow your own domain. The Pro and Business plans are priced at $7.5 and $20 per month respectively. These plans offer free domain, more storage and bandwidth, detailed stats, mobile optimization, advanced SEO options and lots of other features.

Pros

  • Comes with a free plan so you can test out the web builder.
  • Mobile apps so you can edit your site on the go.

Cons

  • Doesn’t come with a newsletter builder. 
  • Unable to create membership sites.

Final Words

Thanks to the website builder platforms, it has become a lot easier to create a website. These platforms allow you to set up a website within a few minutes and optimize your website down the road. Now that you have this in-depth comparison of all these platforms, you can choose your desired platform and get started with your website.

If you ask my opinion, I will choose WordPress because of its flexible, versatile nature, powerful customization options and reliable support. But if you want a speedier option with less clutter, go for Weebly. The simple, intuitive page builder and full ecommerce support make it an obvious choice for anyone.

That was my opinion. But what about you? Which website builder platform are you using right now? How is your experience so far? Let me know in the comments.

The post Wix vs Squarespace vs Virb vs Weebly vs Jimdo vs WordPress Theme Builders appeared first on SoftwareFindr.

Written by - Visit Website

Posted in Stuff from wprocks.com | No Comments »

WordPress Child Theme: The Ultimate Guide

January 13th, 2017 by admin

WordPress Theme Customization comes loaded with a plethora of possibilities. Having tried a large number of techniques for styling my WordPress website’s theme, I’ve been totally impressed with the way things go. Child theme is one such stunning way oftweaking an existing WordPress theme for a fresh look and feel.

In today’s post, I’ll be sharing some vital basics of WordPress Child Themes. I’m sure the pointers covered here would alter your thinking about WordPress theme development. So, let’s move on with knowing everything about these child themes.

What exactly is a WordPress Child Theme?

WordPress child theme is basically a theme which inherits the styling and functionality of a different theme, called the parent theme. If you intend to preserve your theme modifications, then working with a child theme is what you can do without getting confused. Plus, using a child theme is also an excellent means of speeding up the overall WordPress theme development time.

Understanding the file structure for a WordPress child theme

Child themes are located in /wp-content/themes/ just like any other WordPress theme. Plus, they can be activated via the WordPress admin panel, as done in case of a traditional WordPress theme. Every child theme has a style.css file and a functions.php file, excluding a theme file. Additionally, it also includes image folders, include folders and script folders.

Creating and activating WordPress Child Theme

As the very first step, you need to create a child theme directory which will then be placed in wp-content/themes. It is not necessary to append the name of your child theme directory with -child. Next, you need to create the child theme’s stylesheet, called style.css. This stylesheet must begin with the following:

/*

Theme Name: Twenty Fifteen Child

Theme URI: http://example.com/twenty-fifteen-child/

Description: Twenty Fifteen Child Theme

Author: Takashi Irie

Author URI: http://example.com

Template: twentyfifteen

Version: 1.0(svn)

Text Domain: twenty-fifteen-child

*/

In the above text, you’ll be expected to replace the word ‘example’ with details that are relevant to your WordPress theme. Also, the template line represents the directory name of the parent theme. In this post, I’ve kept the parent theme as Twenty Fifteen, so the template name is twentyfifteen.

Finally, you need to enqueue the parent and child theme stylesheets using wp_enqueue_script() in your child theme’s functions.php file. The function associated with this step is shown below:

add_action( 'wp_enqueue_scripts', 'theme_enqueue_styles' );

function theme_enqueue_styles() {

wp_enqueue_style( ‘parent-style’, get_template_directory_uri() . ‘/style.css’ );

}

The above code function works only if the parent theme uses a single main style.css to hold all the css. However, if your parent theme has multiple .css files(for eg: style.css, ie.css, main.css etc.), then you need to maintain all parent theme dependencies.

With that your child theme is ready for activation. Simply login to your site’s admin area and go to Administration Panel-> Appearance-> Themes where you can see the child theme listed. Now, simply activate the child theme.

The method for importing parent theme styles

You just need to add the below mentioned single line of code to your ChildTheme style.css in order to import the parent theme styles:

/*

Theme Name: Fission

Description: A Child Theme of Fusion

Template: fusion

*/

@import url(../fusion/style.css);

With the use of above code, you’ve simply created a safe area for making changes to your parent theme, without the need for touching any of the original theme files.

Internationalization of WordPress Child Themes

Much like the wide variety of extensions available for WordPress websites/blogs, even the WordPress child themes can be easily translated into different languages using the gettext functions. Just follow the below steps for doing the same:

Step 1– Add a new languages directory with a format as: my-theme/languages/

Step 2– Add language files to this languages directory. Each language filename must have the format like: he_IL.mo and he_IL.po.

Step 3– Load the textdomain

You can define the text domain in load_child_theme_textdomain() in the child theme’s functions.php file during the after_setup_theme action. This text domain will be used for translating all the strings available within the child theme. Plus, you can use GetText functions for adding i18n support for these strings.

Here’s the code snippet associated with textdomain:


The gettext function is shown below:


Therefore, all strings which use “my-child-heme” textdomain can be translated into different languages. These translated files will be stored in “/languages/” directory.

That’s it!

Summing Up

Hopefully I’ve succeeded in offering you a basic understanding of a WordPress child theme. Perhaps one of the smartest ways of modifying WordPress themes, these child themes make WP theme customization an absolutely stunning experience.

The post WordPress Child Theme: The Ultimate Guide appeared first on SoftwareFindr.

Written by - Visit Website

Posted in Stuff from wprocks.com | No Comments »